Monday, January 24, 2011

Giveaway!

a little etsy love

If you hop on over to A Little Etsy Love this week, you can enter to win one of my airplane baby mobiles.

A big thanks to Erin for the feature!

Friday, January 14, 2011


My heart and prayers go out to those affected by the tragedy that took place here in Tucson on Saturday.

Image from CactusHuggers.

Monday, January 3, 2011

Project Restyle


I have a new plan to try and limit my new years resolutions, in hopes that with only a few I will actually accomplish one or two of them. :)

I week or two ago I read about Project Restyle on Smile and Wave, and have decided to add this in as a fun "resolution" this year-- learn how to remake things fashionably, on a small budget. So this is me officially committing to Project Restyle.

Basically, you take unwanted, damaged or unusable vintage or used items, take before and after photos, and share them with the group on flickr.

And of course I will be posting them here for you all to see!

Tuesday, December 28, 2010

Tutorial: How to import designs into Silhouette Studio

This blog post is for all Silhouette digital craft cutter users-- especially those who are new to the Silhouette or Silhouette Studio software.

I am going to show how you can import .gsd files into the silhouette software to cut. The .gsd file type is what I always save my free designs as for Silhouette users.

Also, this tutorial is on their mac software, but I am assuming it is basically the same in the pc software.

1. You need to download the file from my blog and unzip it. If you are just using the Silhouette, don't even worry about the .svg file in that folder (SVG files are for Cricut users who also have the additional program "Sure Cuts A Lot" which allows them to hook their cricut up to the computer and cut designs that aren't on their cartridges). Save the .gsd file into whatever file folder on your computer you have decided to keep downloaded cut files in.

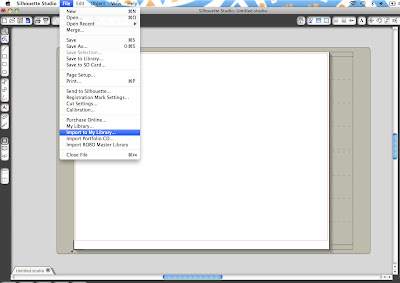
2. Open Silhouette Studio. Select "File --> Import to My Library"


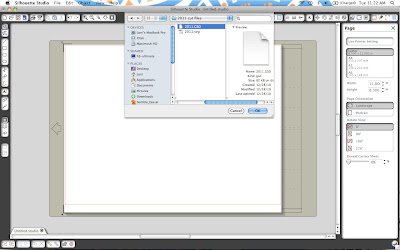
3. Select the file from whatever folder you have saved it in.


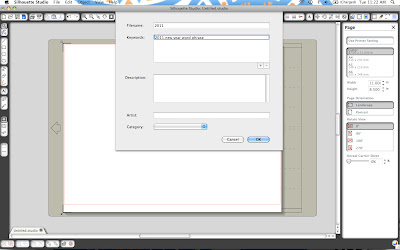
4. It will ask you to name the file and add keywords. This is optional but I went ahead and added a few to help me find it in case I have a lot of files in the future. Hit OK.

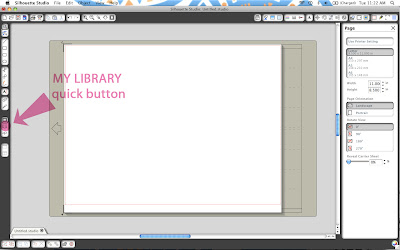
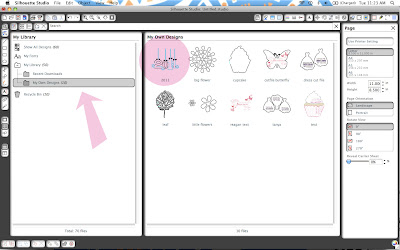
5. Next you have to access your library. I have highlighted the little shortcut button in pink. It's on the left of the screen. Click that to access your library.

6. Next you will need to click "My Own Designs." It is a sub folder of "My library". I have pointed it out with a huge pink arrow in this next picture. Double click on the design that you added in (in this example, it is the 2011 design.) When you double click it, it will be added to your drawing area.

7. Go back to your drawing area (by either closing the library with the "X" in the upper right corner of the window or by hitting the shortcut button on the left). The design is right there on the drawing area. I am not sure why it sometimes comes in colored weird, so I click the "Line color option" button at the top and change it to all grey. However, it isn't necessary to do this. It will still cut correctly without doing so.
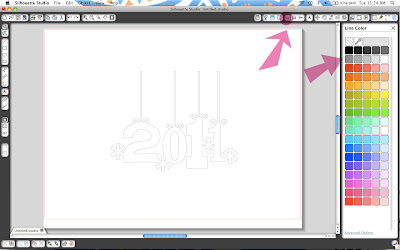
Free 2011 Cut File

New Year's Eve is almost here! I hope you all have some fun plans. We have JB's family in town this week and so we will be celebrating with them.


I designed this download with the idea in mind that the "2011" could hang from the top of a scrapbook page.

Click here to download a zip file with a svg and a gsd file inside (for both Sure Cuts a Lot and Silhouette users).

Enjoy!

ps later today (or maybe tomorrow...) I will be doing a tutorial of how to load these files into the new silhouette software for anyone that needs assistance so look for that soon!

Thursday, December 23, 2010

Merry Christmas

JB and I never got around to taking professional pics for our Christmas card this year. Can you tell? :)


This picture is from "Rooster Cogburn's Ostrich Farm" just north of Tucson. I was seriously afraid that they were going to attack me. They tried.

Friday, December 17, 2010

Vintage Print Baby Dress


Last night I whipped up this baby dress from (surprise) Made by Rae. It's her itsy bitsy baby dress pattern that you can get for free on her blog. Hers is for a newborn, so I did enlarge it quite a bit.

Other changes I made include sewing rickrack around the middle instead of piping and lining the skirt as well as the bodice. The strawberry print (though adorable) is very VERY sheer, so that's the reason for additional lining. It wasn't hard to add at all.


The fabric comes from an estate sale that I went to the other morning-- I got a whole tub full of fabric for only $5.00! ! After sorting through it, there wasn't as much as I had hoped because a lot of it was scraps under 3 inches big. Apparently this lady saved everything! But this strawberry print and a few others totally made it worth it.

ps I know that the new mother that I made this for reads my blog but I am hoping that she is too busy to catch this post... :)